Data Importation is available to admin users of Prima.Law only. We have built the data import tool so that you can download an excel file with the format for the data importation. With those template files, you can begin to import data into your account.
WARNING
If you are given access to the data importation tool, you can really mess up your account. So proceed with caution.
Steps to performing the data importation
Begin by doing the preparation work. Obtain a copy of your data in a format you can actually use. One trick that software companies will do is tell you they can only provide the data in a database file format, or an xml data format. Just make sure you can use the data. Best in excel-friendly format like .xls, .xlsx or .csv format. Preparing your data will occur in Excel.
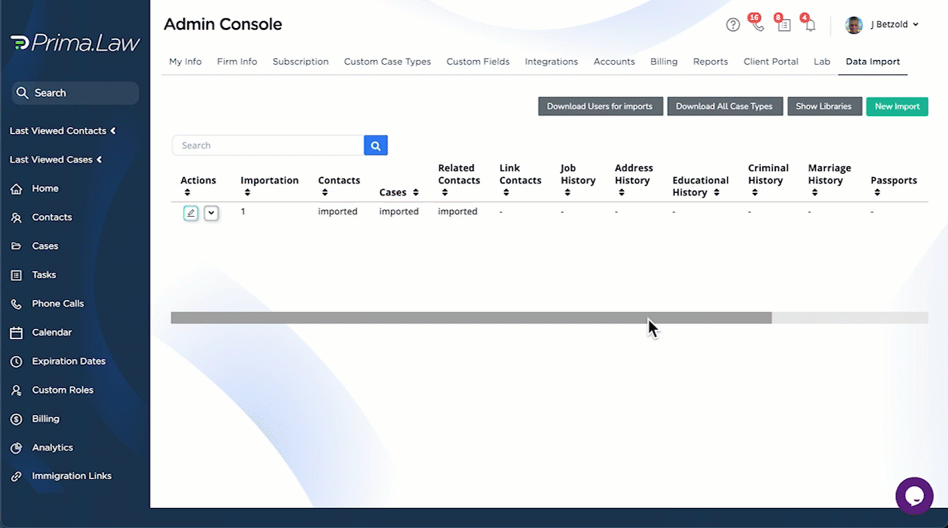
Once you have your data, navigate to the administrator panel in Prima.Law. Navigate to the “Labs” tab and make sure that if “Data Import” is present, that it is enabled. The “Data Import” tab will appear.
Create a new data import.
You will see that you can download template files.
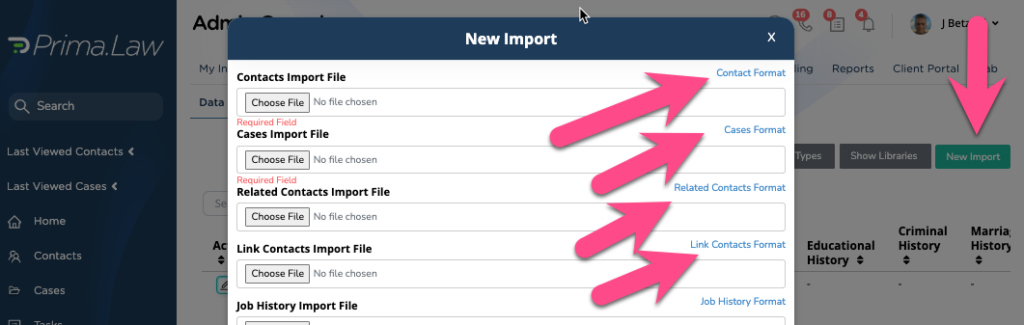
Download the template file starting with “Contacts.” You will need to begin this process with the “Contacts.” This allows Prima to later link your contacts to the cases, and relate the tasks and calls and other items correctly.
Once you have the import file prepared correctly, you will return to this screen and upload your contacts file to begin the process.
You can begin with only uploading the contacts file. Then you must proceed to import the cases file (if you have cases to import). You can always return later to upload the cases, and then all the other items that you have to import.
Each “import” job stands on its own. This means that when you import a set of contacts, all the corresponding cases, tasks, notes etc… are to be imported in that same “import” job. If you are importing data from multiple sources, you are able to create 1 importation for each data source. As stated above, you can go back to each “import” job and undo it, or add things to it like tasks, notes or other items that correspond to that data source.
Tips for a successful importation
Make sure that you check the correct data format for each column of data you are importing. If you see that an importation has failed, you need to check the format of the data that you are importing in that sheet. This is a reason that it is a good idea to import one file at a time, so you can see where the process failed and on which file.
There are some columns of data that are required to contain some value. For example, see the contacts template and you will see an asterisk “*” next to first name and last name. This indicates that no item in this column can be blank, or the process of importing will fail.
Make sure that you maintain backups of the data you received from your previous provider. When manipulating all this data, it is easy to make a mistake. Just be sure to have a backup at every stage.
Make sure to maintain the unique id for each contact, and you will see that for things like tasks, and notes, the unique id for that contact will be there as well. Those are needed to make sure the items are all connected to the right records. If your data does not come with the unique id, you will have to create one for the contacts and the tasks and notes etc… This will take some Excel Spreadsheet superpowers, but it can be done. It is for the account holder to perform this task as it is not a service provided by Prima.